
Clip Studio Paint for Beginners: How to Start Digital Drawing With a Graphic Tablet
Willing to learn how to draw with a digital tablet? Clip Studio Paint is perfect for beginners! This software was created primarily for artists like you and me, making it a great starting point if you’re considering switching to a graphic tablet and learning digital drawing.
Clip Studio Paint offers useful tools for creating digital sketches, illustrations, and finished artwork!
Set Up Your Graphic Tablet: A Beginner-Friendly Starting Point
Connect your graphic tablet to your computer or laptop (I’m using a MacBook Pro; the software works perfectly). Then open Clip Studio Paint and test your pen pressure. Pressure sensitivity lets you create lighter or heavier strokes, giving your digital drawing a more natural feel.
If you are an artist used to drawing in a sketchbook, using a graphic tablet may feel weird, almost uncomfortable, but I promise you that this feeling will disappear over time as you’ll better understand how to work with it.
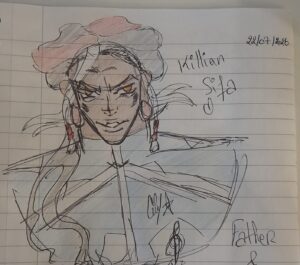
Graphic Tablet vs. Traditional Paper and Pen: Which Is Better for Artists?
Start With Simple Digital Sketches
When learning Clip Studio Paint for Beginners, don’t worry about mastering every tool immediately. Choose a basic pencil or pen brush and practise lines, circles, shapes, and simple objects.
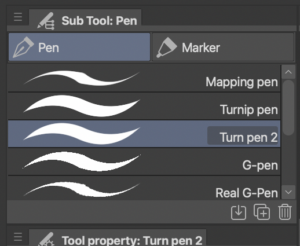
Personally, I never use any pencils, whether I’m working on my sketches or line art. I only use pens for my projects, and the turnip pen is my favourite (as you can see in the picture above, I duplicated a second one that defaults to a bigger brush size, so I can increase and then decrease the brush size, making the drawing process faster). Apart from the turnip pen, I like to use the mapping pen, but it’s only used around the eyes and on eyelashes to add a traditional pen effect to my character’s eyes, which is the part with the most expression.
Creating quick digital sketches is an excellent way to get comfortable with your tablet. Your first drawings may feel strange because you’re looking at the screen instead of your hand, but regular practice will improve your coordination.
Learn How Layers Work
A must-know when working on a digital tablet and with any software: layers. These digital “papers” are essential because they allow you to organise your work, for example, and focus on a specific body area, without deleting the entire work when only one area doesn’t please you.
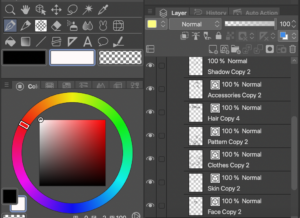
You see several layers (for one sub-folder only) that I edited the names of, so I would know what they refer to.
It’s great to avoid drawing one character on one layer when you have to make corrections.
Using the picture above as an example, I separated several parts of my character into separate layers; as you can see, the face and skin (which represent the body) are on two different layers to avoid messing up my illustration. Plus, it’s important for me to work on two different layers because when I finish inking, I use a tool called Correct Line for the finishing look, which gives a more artistic tone.

In addition, sketches, line art, and colours are separated into specific folders, which helps me identify them and makes your work much easier to manage. It can be a bit annoying at the beginning, but trust me, it will save your life over time!
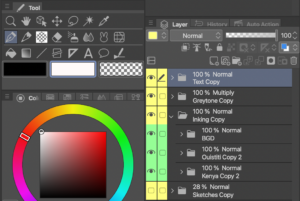
Greytone or Colour, depending on whether I’m working on a Black-and-white or a colour page.
In the Inking folder, there are subfolders for each character, since I don’t want them drawn on the same layer.
This means I create several layers (face, skin, clothes, hair, etc) for each sub-folder.
Just copy and paste; you don’t need to write the same thing over and over again.
You can keep your sketch, line art, and colours on separate layers, making your artwork much easier to edit. 😉
For example, you can lower the opacity of your sketch drawn on raster layers before creating clean line art on a new (vector) layer. This simple workflow can make digital illustration much more manageable for beginners.
Practise With Small Projects
Instead of starting with a complicated illustration, create simple digital sketches of characters, landscapes, or anything that interests you. Experiment with different brushes and gradually explore tools such as stabilisation, selection, blending, and colouring.
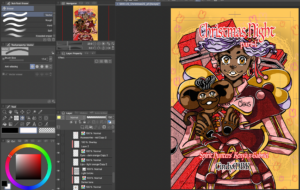
CindyMBK’s illustration of Kenya and Ouistiti
Personally, I mostly used the following tools on Clip Studio Paint despite years of having the software:
- Pen: turnip pen for any drawing (sketches and line art) and mapping pen.
- Eraser: vector and rough are the ones I use most, but I also use hard and soft from time to time.
- Airbrush: mostly used for lips (when it’s coloured only).
- Blend: Use primarily on illustrations to blend the lips and nose (shadow) with the skin tone for a more natural look.
- Decoration: visual effects (hexagons, bunnies, cats) that I usually place on BGD.
- Figure: to draw lines and rectangles (sometimes I use the circle, too), but I barely use other figures.
- Correct Line: the final touch after passing through the sketch, and making the illustration visually more appealing.
- Raster Layer: used specifically to create layers for sketches, coloured (illustrations) or black-and-white (manga panels)
- Vector Layers: used only for line art, where I can then use an eraser, like a vector or rough, that will easily remove a line I’m not happy with.
- Folders: to make my work more organised and come back days or weeks later knowing which folders represent what.
- Tone: to add effect to an illustration (skin, clothes or background) and make it less dull.

Keep Practising
Learning Clip Studio Paint as a beginner takes time, but consistent practice makes a difference. Start with basic digital drawing exercises, experiment with different tools, and save your sketches to track your progress.
With patience and regular practice, your graphic tablet can become a powerful tool for developing your digital art skills.
