
How to Use Multiply in Clip Studio Paint for Easy Shading
Shading can make your digital art look more three-dimensional, but choosing the right layer mode can confuse beginners. In Clip Studio Paint (CSP), the Multiply blending mode is one of the easiest ways to add shadows to illustrations, characters, and manga panels without changing your original colours.
What Is Multiply in Clip Studio Paint?
Multiply is a blending mode that darkens colours beneath the active layer. Instead of simply placing an opaque colour over your artwork, it combines the colour on the Multiply layer with the colours below it.
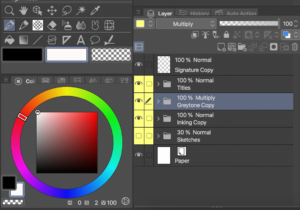
In other words, create a new layer folder and place your layers inside it, such as skin, hair, clothes, lips, and so on. Then, change the folder’s blending mode from Normal to Multiply, as shown in the image above.
This allows the colours to blend smoothly with your line art.
Graphic Tablet vs Traditional Paper and Pen:
Which Is Better for Artists?
How to Use Multiply for Shading
Start with a medium, muted colour rather than pure black for your shadows. Colours like soft purple, brown, or blue-grey are good choices and can give your artwork a more natural look.
You can also choose a different shade depending on the mood and lighting of your illustration. If the shadow looks too strong, lower the Multiply layer’s opacity to soften it.

Use a soft brush to create light, smooth shadows. For stronger, more defined shadows, switch to a harder brush. You can use these darker areas under the hair, around the chin, or in the folds of clothing to give your character more depth. When working on manga panels, the Multiply blending mode is also useful for quickly adding shadows to both characters and backgrounds without changing your original colours.
Keep your Multiply layer separate from your line art. This makes it easy to erase, adjust, or change the opacity of your shading later.
Multiply vs Normal Layer
A Normal layer covers the colours underneath based on the brush’s opacity. A Multiply layer blends with those colours, darkening them.
For beginners, Normal is useful for adding solid colours, while Multiply is often better for fast, flexible shading. Using both together gives you more control over your illustrations and manga artwork.
See how your work will look with the two examples below of one of my original characters, with the Multiply blending mode activated and off.
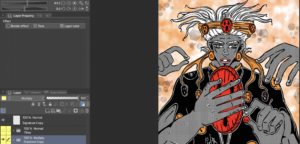
Multiply Mode On.
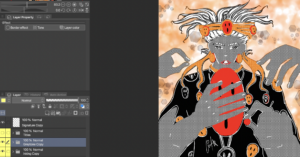
Multiply Mode Off (Normal blending mode).
As you can see in the two images, keeping the layer in Normal mode (see the second image) causes the line art to disappear because the colour layers cover it. That’s why it’s important to switch to the Multiply blending mode when working with colour, black-and-white, or grey tones. This prevents the line art from being covered—unless, of course, that’s the effect you’re going for.
